
In this tutorial, I will show you how Inlets helped me to expose my local endpoints from my homelab that sits behind a Carrier-Grade NAT internet connection.
More on Inlets
First, what is Inlets?
Inlets is a project that Alex Ellis developed, that combines a reverse proxy and websockets to expose your local endpoints to the public via a exit-node. A exit-node in this case will be a $5 VPS which provides me with a Static IP.
Inlets also allow you to dynamically bind and discover your local services to DNS entries with automated TLS certificates to a public IP address over a websocket tunnel.
Have a look at the inlets project to learn more.

More on my Current Problem
I like to tinker around a lot as I have a very curious mind, therefore I'm running a couple of VPS's from different providers. But this becomes a costly excercise after some time, so I thought I will look into saving some costs.
I recently upgraded my home internet connection to fibre so I have good download/upload speeds, and since the Raspberry Pi comes now in 4GB models, I thought let's move my hosting to my homelab.
Then I realised my ISP uses a Carrier Grade NAT (CGN), basically everyone on their network shares the same Public IP, which makes it difficult to port forward traffic (like you would normally do), and wanting to use HTTPS on some of my web services made me think that's a no-go zone :( .
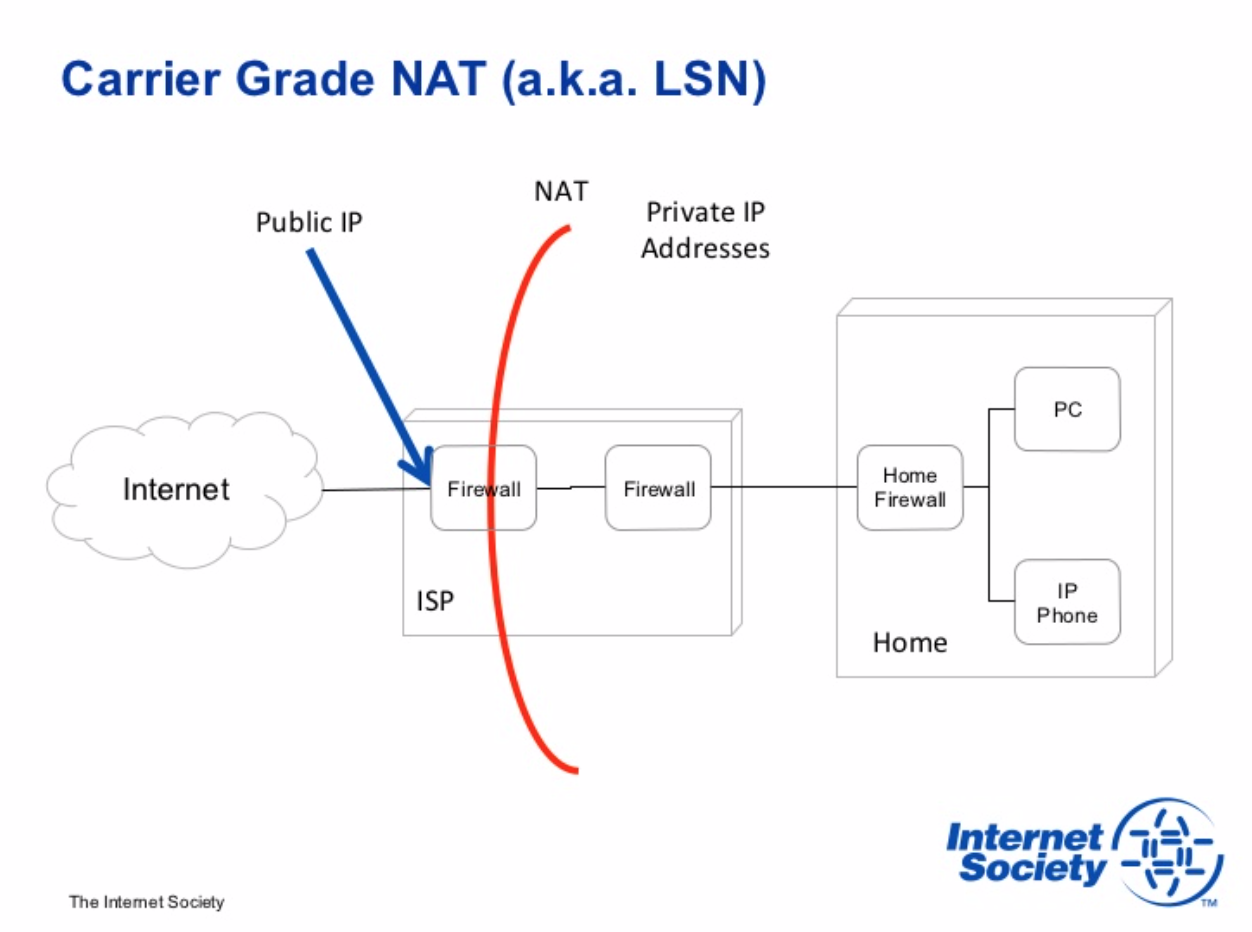
Solution: Inlets
I then discovered Inlets. The best of all, it solves my CGN issue and it does HTTPS automatically!! Super easy to setup and works like a charm!
This was literally my reaction:

What we will do today:
- I will demonstrate building a Python Flask API that will return random data in JSON, which will run on my Raspberry Pi, then use Gunicorn to run the application as a Daemon.
- Then we will provision a VPS running Ubuntu 18 which will act as my exit-node.
- Create a DNS "A" Record with the IP of my VPS (myapi.inlets.ruan.dev)
- Setup Inlets on my exit-node.
- Setup the Inlets Client on the Raspberry Pi.
- Showing off the awesomeness of connecting to my API over the internet via HTTPS :D
Flask Application on my Raspberry Pi
Let's head over to my Raspberry Pi to start building our API using Python Flask, install the dependencies:
$ sudo pip install virtualenv
$ virtualenv .venv && source .venv/bin/activate
$ pip install flask Faker gunicorn
$ pip freeze > requirements.txt
Our application will use the Faker library to generate random data which we will return as JSON:
$ cat app.py
from flask import Flask, jsonify
from faker import Faker

app = Flask(__name__)
fake = Faker()

def get_random_data():
    payload = {}
    payload['name'] = fake.first_name()
    payload['surname'] = fake.last_name()
    payload['country'] = fake.country()
    payload['job'] = fake.job()
    payload['likes_coffee'] = fake.boolean(chance_of_getting_true=50)
    return payload

@app.route('/api/person', methods=['GET'])
def get_person():
    payload = get_random_data()
    return jsonify(payload)

if __name__ == '__main__':
    app.run()
Use gunicorn to start the application as a daemon and expose the endpoint over 127.0.0.1:8000
$ gunicorn --workers 2 --bind 127.0.0.1:8000 app:app —daemon
Ensure that the port is listening:
$ sudo netstat -tulpn | grep 8000
tcp        0      0 127.0.0.1:8000          0.0.0.0:*               LISTEN      6698/python
Let's test out our API:
$ curl -s http://localhost:8000/api/person | python -m json.tool
{
    "country": "Chad",
    "job": "Producer, radio",
    "likes_coffee": true,
    "name": "Jennifer",
    "surname": "Combs"
}
Setup the DNS Record
Setup the A Record that points to the Public IP of your VPS, in my case myapi.inlets.ruan.dev => 95.179.188.156

Setup the Inlets Exit Node
Once you are logged onto your VPS (in my case), generate your token and save it to your environment:
$ export INLETSTOKEN=$(head -c 16 /dev/urandom | shasum | cut -d" " -f1)
Make sure the token is in your environment:
$ echo ${INLETSTOKEN}
99377fd98062f1559aef634dba7d508443f58979
Installing Inlets is simplicity at it's best, with one easy command execution, which auto detects your architecture:
$ curl -sLS https://get.inlets.dev | sudo sh
x86_64
Downloading package https://github.com/alexellis/inlets/releases/download/2.2.0/inlets as /tmp/inlets
Download complete.

Running as root - Attempting to move inlets to /usr/local/bin
New version of inlets installed to /usr/local/bin
Version: 2.2.0
Git Commit: 2f5e458d062e55dda9f08109f7b2c3c6919fcdf9
Get the systemd unit file and move it into it's respective path:
$ curl -sLO https://raw.githubusercontent.com/alexellis/inlets/master/hack/inlets.service
$ mv inlets.service /etc/systemd/system/inlets.service
Let's have a look at our inlets.service unit file:
$ cat /etc/systemd/system/inlets.service
[Unit]
Description=Inlets Server Service
After=network.target

[Service]
Type=simple
Restart=always
RestartSec=1
StartLimitInterval=0
EnvironmentFile=/etc/default/inlets
ExecStart=/usr/local/bin/inlets server --port=80 --token="${AUTHTOKEN}"

[Install]
WantedBy=multi-user.target
We need to save the token value to the environment file that is referenced from the unit file:
$ echo "AUTHTOKEN=$INLETSTOKEN" > /etc/default/inlets
Ensure the file is readable and the content is as expected:
$ cat /etc/default/inlets
AUTHTOKEN=99377fd98062f1559aef634dba7d508443f58979
Updating the inlets server port to 8080 so that we can allow Caddy to run on port 80 (and 443):
$ sudo sed -i s/80/8080/g /etc/systemd/system/inlets.service
Since we've created the unit file, reload the systemd daemon, start and enable the inlets service:
$ sudo systemctl daemon-reload
$ sudo systemctl start inlets
$ sudo systemctl enable inlets
Verify that the inlets server is started:
$ systemctl status inlets
- inlets.service - Inlets Server Service
   Loaded: loaded (/etc/systemd/system/inlets.service; enabled; vendor preset: enabled)
   Active: active (running) since Tue 2019-08-13 15:55:37 UTC; 16s ago
 Main PID: 2140 (inlets)
    Tasks: 4 (limit: 1109)
   CGroup: /system.slice/inlets.service
           └─2140 /usr/local/bin/inlets server --port=8080 --token=99377fd98062f1559aef634dba7d508443f58979

Aug 13 15:55:37 inlets-exit-node systemd[1]: Started Inlets Server Service.
Aug 13 15:55:37 inlets-exit-node inlets[2140]: 2019/08/13 15:55:37 Server token: "99377fd98062f1559aef634dba7d508443f58979"
Aug 13 15:55:37 inlets-exit-node inlets[2140]: 2019/08/13 15:55:37 Listening on :8080
We will use Caddyserver to listen on port 80 and 443 with automatic HTTPS using Letsencrypt.
Get the latest Caddyserver binary from the releases page for your architecture, in my case its amd64 and download to the current working directory:
$ wget https://github.com/caddyserver/caddy/releases/download/v1.0.1/caddy_v1.0.1_linux_amd64.tar.gz
$ tar -xf caddy_v1.0.1_linux_amd64.tar.gz
Create the Caddyfile in the current working directory and provide your DNS name, where I will use my current one myapi.inlets.ruan.dev:
$ cat Caddyfile
myapi.inlets.ruan.dev

proxy / 127.0.0.1:8080 {
  transparent
}

proxy /tunnel 127.0.0.1:8080 {
  transparent
  websocket
}
Create a screen session:
$ screen -S CADDY
When starting the caddy server you will be asked for your email address, for requesting your certificate.
$ ./caddy
Activating privacy features...

Your sites will be served over HTTPS automatically using Let's Encrypt.
By continuing, you agree to the Let's Encrypt Subscriber Agreement at:
  https://letsencrypt.org/documents/LE-SA-v1.2-November-15-2017.pdf
Please enter your email address to signify agreement and to be notified
in case of issues. You can leave it blank, but we don't recommend it.
  Email address: [email protected]

2019/08/13 16:05:49 [INFO] acme: Registering account for [email protected]
2019/08/13 16:05:49 [INFO] [myapi.inlets.ruan.dev] acme: Obtaining bundled SAN certificate
2019/08/13 16:05:50 [INFO] [myapi.inlets.ruan.dev] AuthURL: https://acme-v02.api.letsencrypt.org/acme/authz/xx
2019/08/13 16:05:50 [INFO] [myapi.inlets.ruan.dev] acme: use tls-alpn-01 solver
2019/08/13 16:05:50 [INFO] [myapi.inlets.ruan.dev] acme: Trying to solve TLS-ALPN-01
2019/08/13 16:05:56 [INFO] [myapi.inlets.ruan.dev] The server validated our request
2019/08/13 16:05:56 [INFO] [myapi.inlets.ruan.dev] acme: Validations succeeded; requesting certificates
2019/08/13 16:05:58 [INFO] [myapi.inlets.ruan.dev] Server responded with a certificate.
done.

Serving HTTPS on port 443
https://myapi.inlets.ruan.dev

Serving HTTP on port 80
http://myapi.inlets.ruan.dev
Now that the inlets server has been setup, note down the token, as we will need this for the client:
$ echo ${INLETSTOKEN}
99377fd98062f1559aef634dba7d508443f58979
Inlets Client Setup
Head back to the Raspberry Pi as we want to establish the client to connect with our inlets server.
Install inlets on the raspberry pi (client side):
$ curl -sLS https://get.inlets.dev | sudo sh
armv6l
Downloading package https://github.com/alexellis/inlets/releases/download/2.2.0/inlets-armhf as /tmp/inlets-armhf
Download complete.

Running as root - Attempting to move inlets to /usr/local/bin
New version of inlets installed to /usr/local/bin
Version: 2.2.0
Git Commit: 2f5e458d062e55dda9f08109f7b2c3c6919fcdf9
Establistish the connection to the inlets server:
$ inlets client \
> --remote wss://myapi.inlets.ruan.dev \
> --upstream=myapi.inlets.ruan.dev=http://127.0.0.1:8000 \
> --token=99377fd98062f1559aef634dba7d508443f58979

2019/08/13 17:22:17 Upstream: myapi.inlets.ruan.dev => http://127.0.0.1:8000
2019/08/13 17:22:17 Token: "99377fd98062f1559aef634dba7d508443f58979"
map[X-Inlets-Id:[377cb0d39ec64b2599676673603c0cec] X-Inlets-Upstream:[myapi.inlets.ruan.dev=http://127.0.0.1:8000] Authorization:[Bearer 99377fd98062f1559aef634dba7d508443f58979]]
INFO[0000] Connecting to proxy url="wss://myapi.inlets.ruan.dev/tunnel"
Enjoy the awesomeness of Inlets
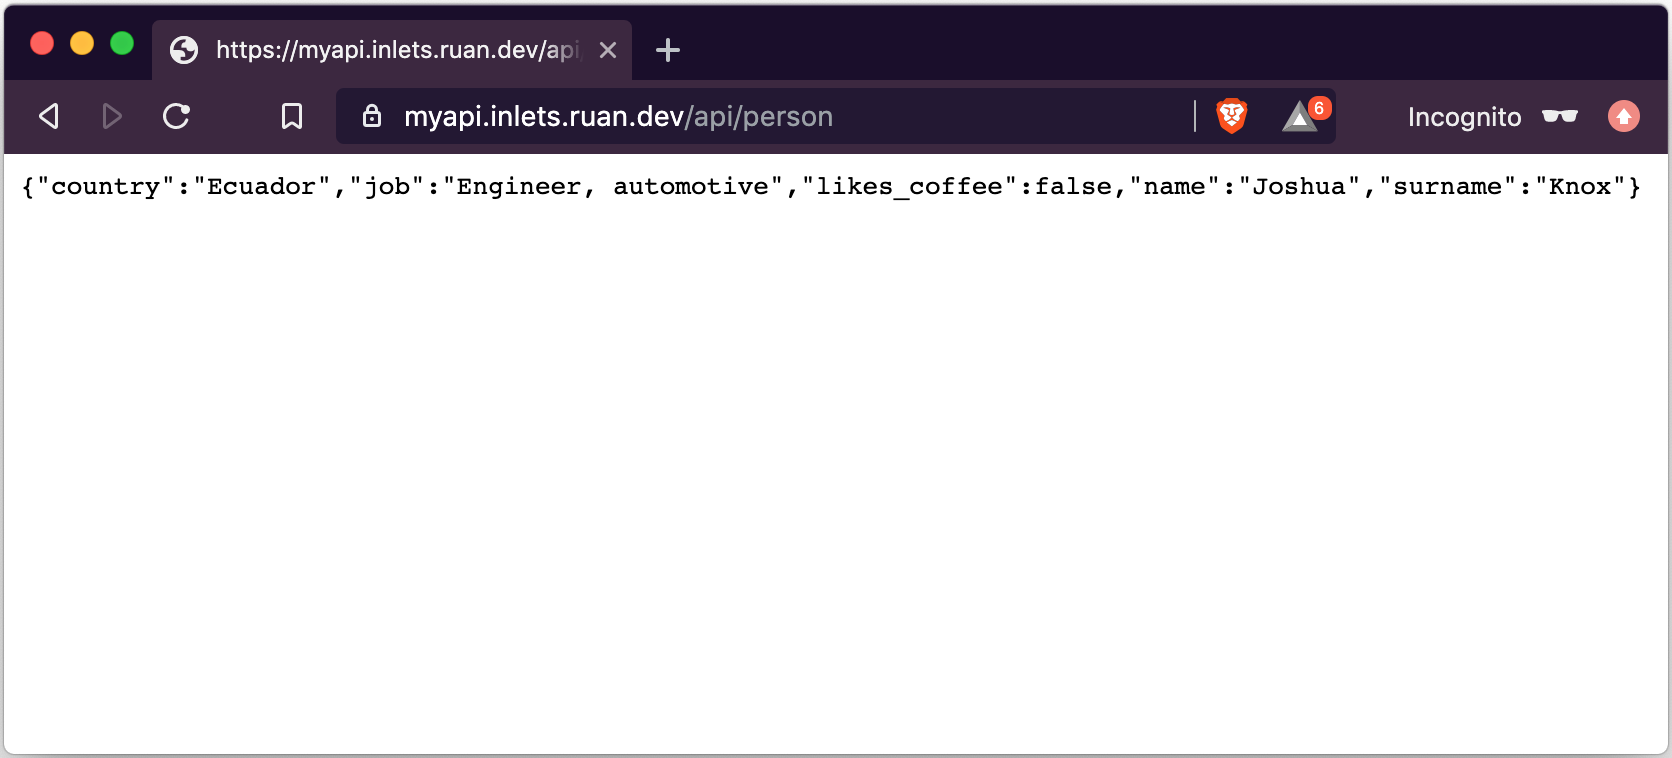
Now the time to test out our setup. From a remote location, let's make a GET request to our API on our DNS name via HTTPS protocol:
$ curl -iv https://myapi.inlets.ruan.dev/api/person

*   Trying 95.179.188.156...
* TCP_NODELAY set
* Connected to myapi.inlets.ruan.dev (95.179.188.156) port 443 (#0)
* ALPN, offering h2
* ALPN, offering http/1.1
* Cipher selection: ALL:!EXPORT:!EXPORT40:!EXPORT56:!aNULL:!LOW:!RC4:@STRENGTH
* successfully set certificate verify locations:
*   CAfile: /etc/ssl/cert.pem
  CApath: none
* TLSv1.2 (OUT), TLS handshake, Client hello (1):
* TLSv1.2 (IN), TLS handshake, Server hello (2):
* TLSv1.2 (IN), TLS handshake, Certificate (11):
* TLSv1.2 (IN), TLS handshake, Server key exchange (12):
* TLSv1.2 (IN), TLS handshake, Server finished (14):
* TLSv1.2 (OUT), TLS handshake, Client key exchange (16):
* TLSv1.2 (OUT), TLS change cipher, Client hello (1):
* TLSv1.2 (OUT), TLS handshake, Finished (20):
* TLSv1.2 (IN), TLS change cipher, Client hello (1):
* TLSv1.2 (IN), TLS handshake, Finished (20):
* SSL connection using TLSv1.2 / ECDHE-ECDSA-AES256-GCM-SHA384
* ALPN, server accepted to use h2
* Server certificate:
*  subject: CN=myapi.inlets.ruan.dev
*  start date: Aug 13 15:05:57 2019 GMT
*  expire date: Nov 11 15:05:57 2019 GMT
*  subjectAltName: host "myapi.inlets.ruan.dev" matched cert's "myapi.inlets.ruan.dev"
*  issuer: C=US; O=Let's Encrypt; CN=Let's Encrypt Authority X3
*  SSL certificate verify ok.
* Using HTTP2, server supports multi-use
* Connection state changed (HTTP/2 confirmed)
* Copying HTTP/2 data in stream buffer to connection buffer after upgrade: len=0
* Using Stream ID: 1 (easy handle 0x7f811c804400)
> GET /api/person HTTP/2
> Host: myapi.inlets.ruan.dev
> User-Agent: curl/7.54.0
> Accept: */*
>
* Connection state changed (MAX_CONCURRENT_STREAMS updated)!
< HTTP/2 200
HTTP/2 200
< content-type: application/json
content-type: application/json
< date: Tue, 13 Aug 2019 16:28:01 GMT
date: Tue, 13 Aug 2019 16:28:01 GMT
< server: Caddy
server: Caddy
< server: gunicorn/19.9.0
server: gunicorn/19.9.0
< content-length: 105
content-length: 105

<
{"country":"Honduras","job":"Financial planner","likes_coffee":false,"name":"Mark","surname":"Delacruz"}
* Connection #0 to host myapi.inlets.ruan.dev left intact
Pretty sweet right?
Testing it via our browser:
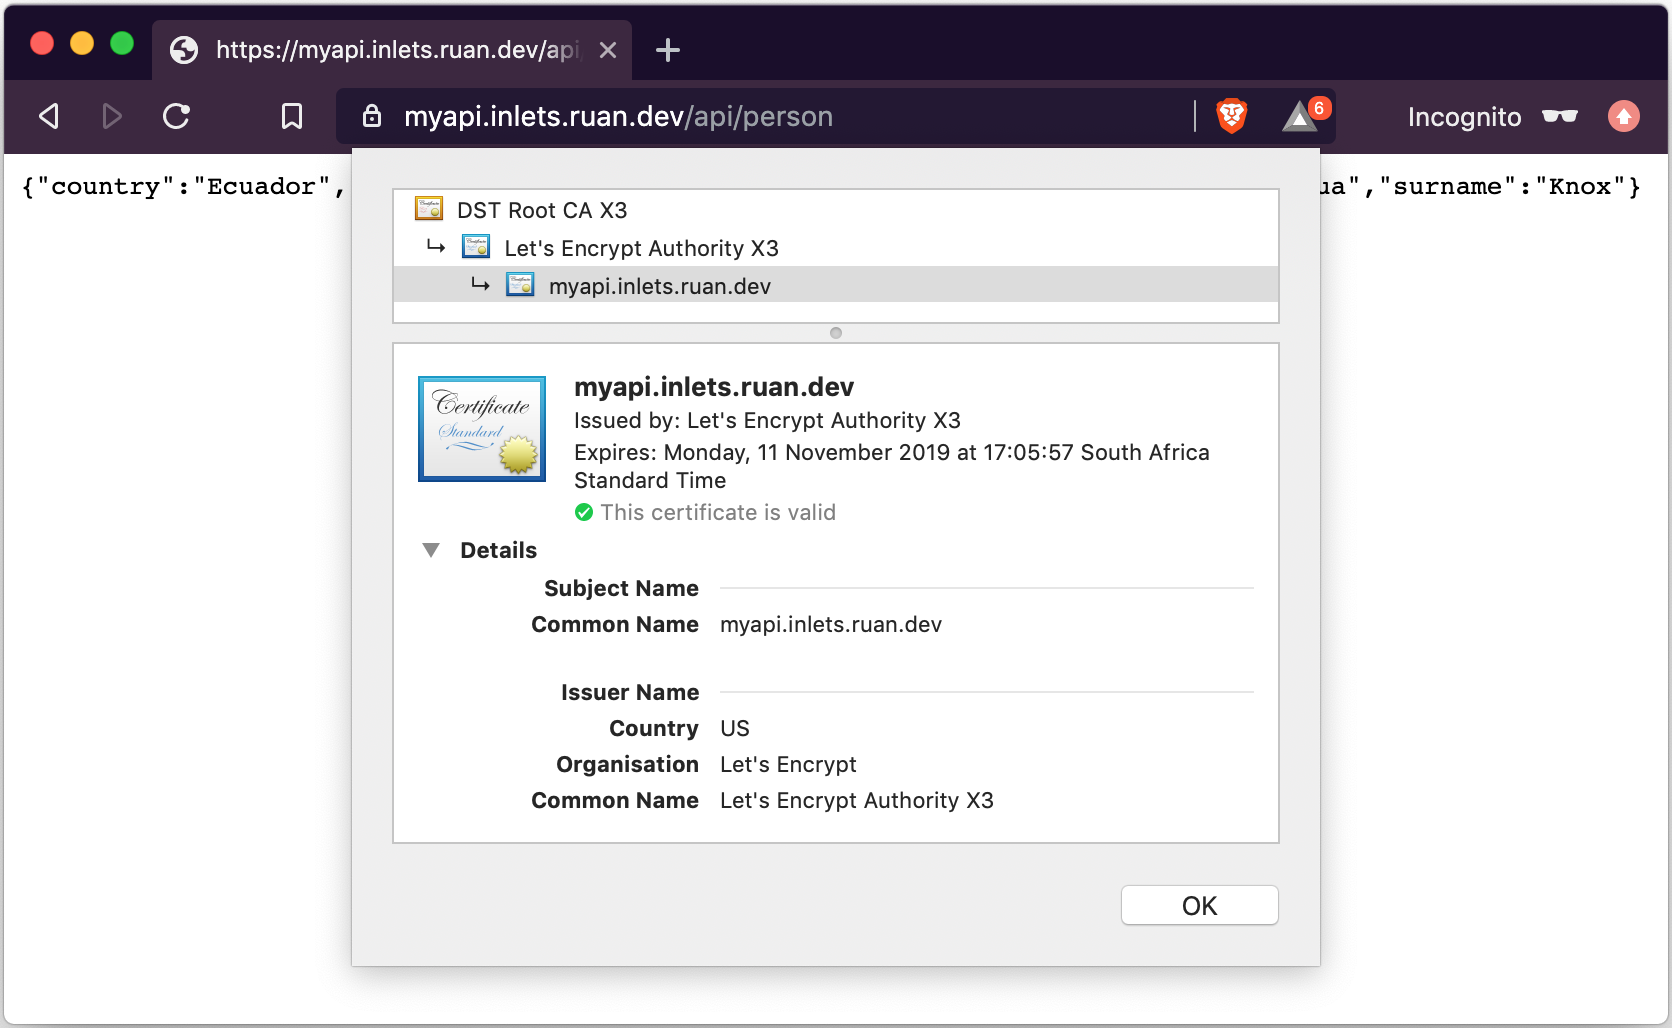
Viewing the certificate:
Thank You
Inlets really helped me out connecting to my homelab via the CGN setup that my ISP has and my exit-node has a Static IP, so I don't need to deal with IP's changing which allows me to not worry about HTTPS issues along the line.
Well done to Alex Ellis for developing this!
Thanks for reading. If you would like to check out more of my content, check out my website at ruan.dev or follow me on Twitter @ruanbekker
Comments