
Today we will build a Restful API using Python Flask, SQLAlchemy using Postgres as our Database, testing using Python Unittest, a CI/CD Pipeline on Gitlab, and Deployment to Heroku.
From our previous post, we demonstrated setting up a Custom Gitlab Runner on Your Own Server for Gitlab CI.
Heroku
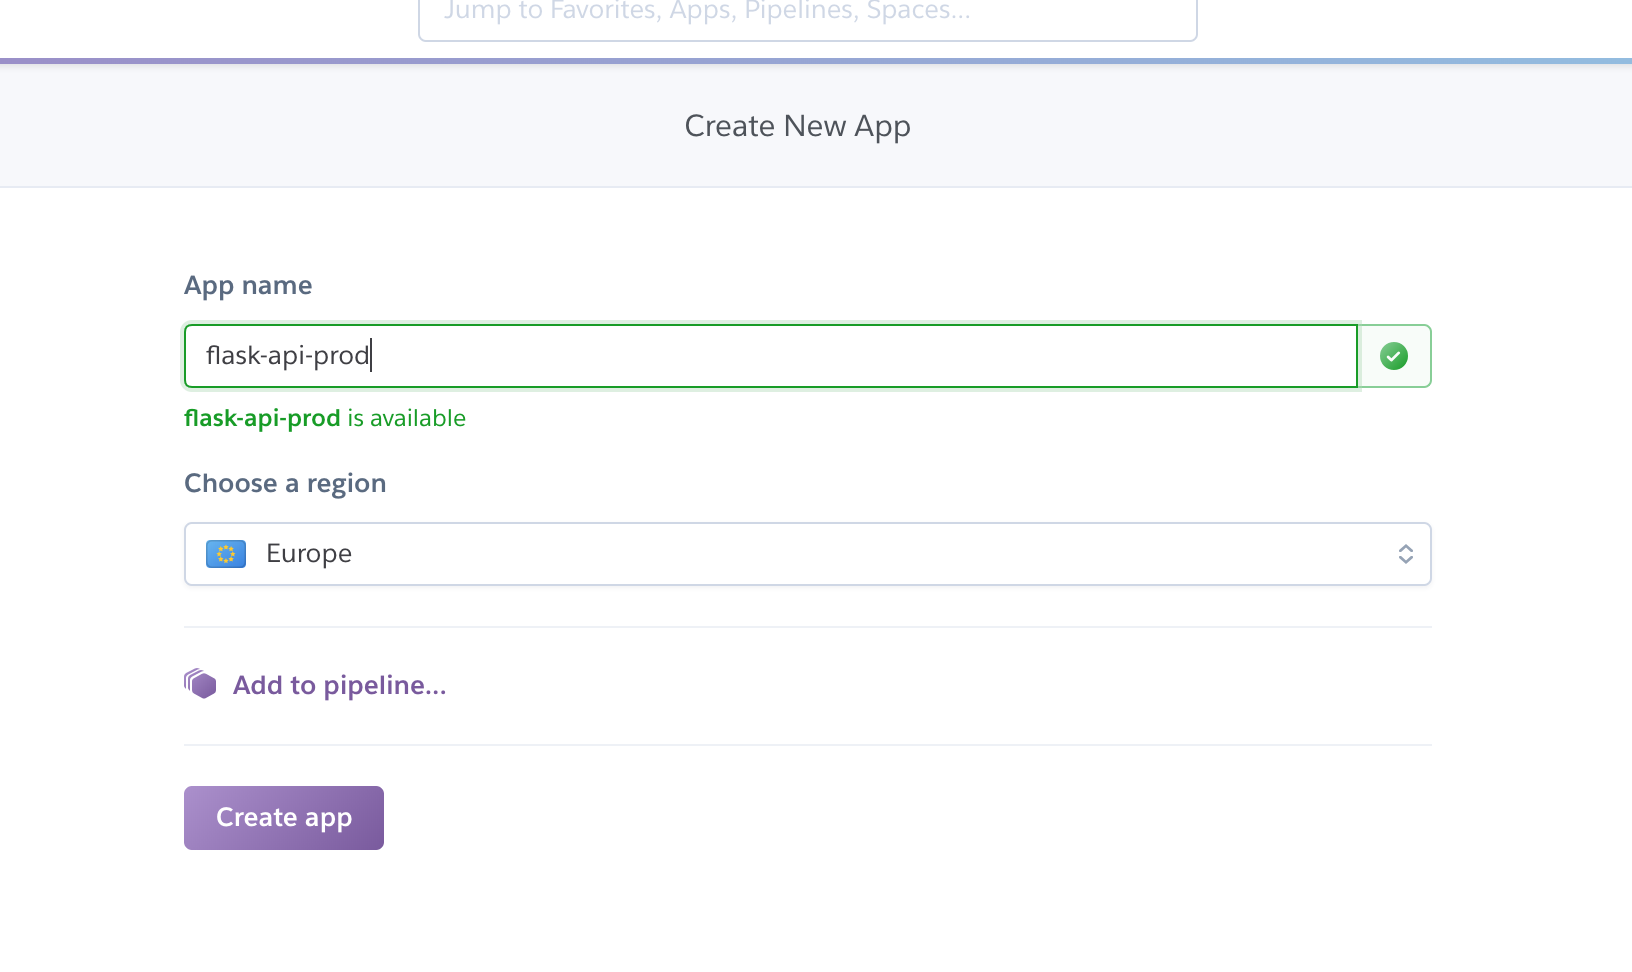
If you don't have an account already, Heroku offer's 5 free applications in their free tier account. Once you have created your account, create 2 applications. I named mine flask-api-staging and flask-api-prod.
You can create the applications via cli or the ui, from the ui it will look more or less like this:

Select an app name and check if the name is available then select create. Note down the name and config as we will use it in our .gitlab-ci.yml config:
Heroku API Key
To allow the deployment of applications to Heroku from Gitlab, we need to generate a API Key on Heroku and save the config in Gitlab.
Head over to your Heroku Dashboard, select Account Settings, scroll to the API Key section and generate a API Key.
Head over to your Gitlab Repository, select Settings, CI/CD, then select Variables enter the Key: HEROKU_API_KEY and the Secret of the API Key into the Value and select Save Variable.
We will reference this variable from our deploy steps.
Heroku Postgres Add-on
Heroku offers a free Postgres Add-On, to activate: Select your application, select Resources, search for the Add-on Heroku Postgres, select and select the Hobby Dev Free version and select provision.
Our Application Code
Clone your repository then let's start by creating our Flask API. Note this is more on Gitlab CI/CD than going into detail into the Flask Application.
Create the files that we will need:
$ touch app.py config.cfg requirements.txt tests.py Procfile
Let's start by populating our configuration for our flask app: config.cfg
#SQLALCHEMY_DATABASE_URI='sqlite:///database.db'
SQLALCHEMY_TRACK_MODIFICATIONS=False
Our Flask Application: app.py
Note that we are using flask-heroku, with this package Heroku will automatically discover your configuration for your database using environment variables. So if you have a postgres add-on, you don't need to specify the location of your database.
If you want to use sqlite, you can remove the heroku instantiation and uncomment the SQLALCHEMY_DATABASE_URI property in your config.cfg
from flask import Flask, jsonify, request
from flask_sqlalchemy import SQLAlchemy
from flask_marshmallow import Marshmallow
from flask_heroku import Heroku
from passlib.hash import sha256_crypt
from datetime import datetime

app = Flask(__name__)
app.config.from_pyfile('config.cfg')
heroku = Heroku(app)
db = SQLAlchemy(app)
ma = Marshmallow(app)

## --Database Models--
class Member(db.Model):
    __tablename__ = 'members'

    id = db.Column(db.Integer, primary_key=True, autoincrement=True)
    email = db.Column(db.String(255), unique=True, nullable=False)
    username = db.Column(db.String(50), unique=True)
    password_hash = db.Column(db.String(100))
    firstname = db.Column(db.String(50), unique=False)
    lastname = db.Column(db.String(50), unique=False)
    registered_on = db.Column(db.DateTime, nullable=False)

class MemberSchema(ma.ModelSchema):
    class Meta:
        model = Member
        fields = ('id', 'username', 'email')

member_schema = MemberSchema(strict=True, only=('id', 'username'))
members_schema = MemberSchema(strict=True, many=True)

## --Views--
@app.route('/')
def index():
    return jsonify({'message': 'ok'}), 200

# list users
@app.route('/api/user', methods=['GET'])
def list_users():
    all_users = Member.query.all()
    result = members_schema.dump(all_users)
    return jsonify(result.data)

# get user
@app.route('/api/user/<int:id>', methods=['GET'])
def get_user(id):
    user = Member.query.get(id)
    result = member_schema.dump(user)
    return jsonify(result.data)

# add user
@app.route('/api/user', methods=['POST'])
def add_user():
    email = request.json['email']
    username = request.json['username']
    password_hash = sha256_crypt.encrypt(request.json['password'])
    firstname = request.json['firstname']
    lastname = request.json['lastname']
    new_user = Member(email=email, username=username, password_hash=password_hash, firstname=firstname, lastname=lastname, registered_on=datetime.utcnow())
    try:
        db.session.add(new_user)
        db.session.commit()
        result = member_schema.dump(Member.query.get(new_user.id))
        return jsonify({'member': result.data})
    except:
        db.session.rollback()
        result = {'message': 'error'}
        return jsonify(result)

# update user
@app.route('/api/user/<int:id>', methods=['PUT'])
def update_user(id):
    user = Member.query.get(id)
    username = request.json['username']
    email = request.json['email']
    user.email = email
    user.username = username
    db.session.commit()
    return member_schema.jsonify(user)

# delete user
@app.route('/api/user/<int:id>', methods=['DELETE'])
def delete_user(id):
    user = Member.query.get(id)
    db.session.delete(user)
    db.session.commit()
    return jsonify({'message': '{} has been deleted'.format(user.username)})

if __name__ == '__main__':
    app.run()
Our tests: tests.py
import unittest
import app as myapi
import json
import sys

class TestFlaskApi(unittest.TestCase):
    def setUp(self):
        self.app = myapi.app.test_client()

    def test_hello_world(self):
        response = self.app.get('/')
        self.assertEqual(
            json.loads(response.get_data().decode(sys.getdefaultencoding())),
            {"message": "ok"}
        )

if __name__ == '__main__':
    unittest.main()
Our requirements file: requirements.txt
Click==7.0
Flask==1.0.2
flask-heroku==0.1.9
flask-marshmallow==0.9.0
Flask-SQLAlchemy==2.3.2
gunicorn==19.9.0
itsdangerous==1.1.0
Jinja2==2.10
MarkupSafe==1.1.0
marshmallow==2.17.0
marshmallow-sqlalchemy==0.15.0
passlib==1.7.1
psycopg2-binary==2.7.6.1
six==1.12.0
SQLAlchemy==1.2.15
Werkzeug==0.14.1
Our Procfile for Heroku: Procfile
web: gunicorn app:app
And lastly, our gitlab-ci configuration which will include our build, test and deploy steps. As soon as a commit to master is received the pipeline will be acticated. Note that our production deploy step is a manual trigger.
Our config for .gitlab-ci.yml. Note to replace your Heroku app names.
image: rbekker87/build-tools:latest

stages:
  - ver
  - init
  - tests
  - deploy

ver:
  stage: ver
  script:
    - python --version
    - whoami

init:
  stage: init
  script:
    - apk add postgresql-dev --no-cache
    - pip install psycopg2-binary
    - pip install -r requirements.txt

run_tests:
  stage: tests
  script:
    - apk add postgresql-dev --no-cache
    - pip install psycopg2-binary
    - pip install -r requirements.txt
    - python tests.py

deploy_staging:
  stage: deploy
  script:
    - git remote add heroku https://heroku:[email protected]/flask-api-staging.git
    - git push heroku master
    - echo "Deployed to Staging Server https://flask-api-staging.herokuapp.com"
  environment:
    name: staging
    url: https://flask-api-staging.herokuapp.com/
  only:
    - master

deploy_production:
  stage: deploy
  script:
    - git remote add heroku https://heroku:[email protected]/flask-api-prod.git
    - git push heroku master
    - echo "Deployed to Production Server https://flask-api-prod.herokuapp.com"
  environment:
    name: production
    url: https://flask-api-prod.herokuapp.com/
  when: manual
  only:
    - master
Send to Gitlab:
Once everything is populated, stage your changes, commit your work and push to master:
$ git add .
$ git commit -m "blogpost demo commit"
$ git push origin master
Once the code has been pushed to master, gitlab will pick it up and trigger the pipeline to run.
Gitlab Pipelines
Head over to Gitlab, select CI/CD -> Pipelines, you should see a running pipeline, select it, then you should see the overview of all your jobs:

If everything has passed you should see the Passed status as shown above.
You will notice that the staging environment has been deployed. Now you can do some testing and when you are happy with it, you can select the play button which will deploy to production on the pipelines dashboard.
Creating the Tables on Postgres
Before we can interact with our API, we need to provision the postgres tables from the database models that we wrote in our application.
Open up a Python shell on Heroku and initialize the tables:
$ heroku run python -a flask-api-prod
>>> from app import db
>>> db.create_all()
>>> exit()
Testing the API:
Now that everything is up and running, its time to test our API.
List the users:
$ curl https://flask-api-staging.herokuapp.com/api/user
[]
Create a User:
$ curl -H 'Content-Type: application/json' -XPOST https://flask-api-staging.herokuapp.com/api/user -d '{"username": "ruanb", "password": "pass", "email": "[email protected]", "firstname": "ruan", "lastname": "bekker"}'
{
  "member": {
    "id": 1,
    "username": "ruanb"
  }
}
List Users:
$ curl -H 'Content-Type: application/json' -XGET https://flask-api-staging.herokuapp.com/api/user
[
  {
    "email": "[email protected]",
    "id": 1,
    "username": "ruanb"
  }
]
Update a User's email address:
$ curl -H 'Content-Type: application/json' -XPUT https://flask-api-staging.herokuapp.com/api/user/1 -d '{"username": "ruanb", "email": "[email protected]"}'
{
  "id": 1,
  "username": "ruanb"
}
Retrieve a single user:
$ curl -H 'Content-Type: application/json' -XGET https://flask-api-staging.herokuapp.com/api/user/1
{
  "email": "[email protected]",
  "id": 1,
  "username": "ruanb"
}
Delete User:
$ curl -H 'Content-Type: application/json' -XDELETE https://flask-api-staging.herokuapp.com/api/user/1
{
  "message": "ruanb has been deleted"
}
Troubleshooting
I had some issues with Heroku, where one was after I deployed, I received this error in Heroku's logs:
code=H14 desc="No web processes running" method=GET path="/"
I just had to scale my web dyno to 1:
$ heroku ps:scale web=1 -a flask-api-staging
Scaling dynos... done, now running web at 1:Free
Have a look at their documentation if you need help with the heroku cli.
And to troubleshoot within the dyno, you can exec into it by running this:
heroku ps:exec -a flask-api-staging
I seriously dig Gitlab-CI and with this demonstration you can see how easy it is to setup a CI/CD Pipeline on Gitlab and Deploy them to Heroku.
Resources:
The code for this demo is available at: gitlab.com/rbekker87/demo-cicd-flask-heroku
For more blog posts on Gitlab, have a look at my gitlab category on blog.ruanbekker.com
Thank You
Please feel free to show support by, sharing this post, making a donation, subscribing or reach out to me if you want me to demo and write up on any specific tech topic.
Thanks for reading!
Comments